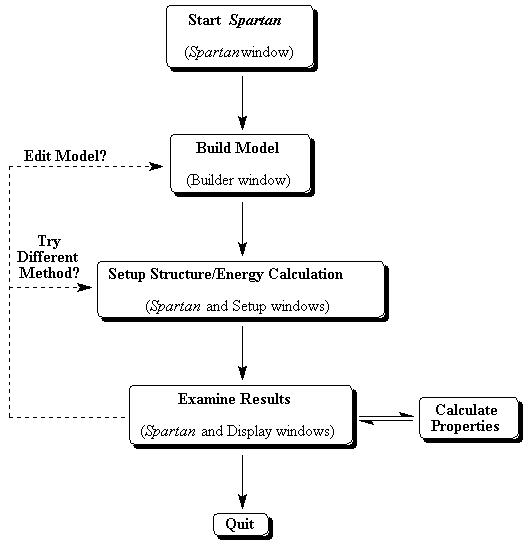
Figure 1a. Modeling Session Flow-chart
Spartan Tutorial
Last revised
This tutorial describes the use of Spartan (Version 5.0), a general-purpose molecular modeling program sold by Wavefunction, Inc. (Irvine, California). Spartan is an unusual molecular modeling package. It is very user-friendly and can be used by students with very little training in chemistry or molecular modeling. In addition, it is a fully functional research tool, and most Spartan users are research chemists.
The Spartan software consists of a suite of computer programs. These programs perform different functions and include a "Builder" program for building and modifying models, several programs for calculating molecular structure and energy, a "Properties" program for deriving molecular properties from previously calculated structures, and a "Graphics" program which can be used to display properties using three-dimensional graphs. All of the programs communicate with one another automatically as needed, therefore, you do not need to concern yourself with their operations. From your point of view, it will always seem as though you are using a single program: Spartan.
Although Spartan's large assortment of modeling tools may seem a bit intimidating, there is a natural relationship between them, and this can be seen by considering a typical modeling session (Fig. 1a). The starting point for most molecular modeling is the user's need to learn something about a molecule. Thus, the user typically 1) builds a trial model of the molecule (Builder), 2) optimizes the molecule's structure and calculates its energy (Setup ...), 3) examines the results to see if they are reasonable (Display), and then repeats one of the earlier steps with a new model if needed, or proceeds to calculate interesting properties (Properties/Graphics.) Each tool, therefore, plays a logical role in the modeling process, and one quickly becomes familiar with each tool after just a small amount of practice.
This tutorial describes the basic Spartan skills needed to model molecules, and can be quickly mastered by students in an introductory chemistry course. The tutorial emphasizes electron distribution, partial charge, and resonance structures. Ideally, the tutorials should be read in front of a computer so that each operation can be tried immediately. It is important to follow the directions exactly as they are described (note, however, that modeling errors, unlike errors in the laboratory, are usually "safe" and easy to correct) and to allow sufficient time for each tutorial (1-2 hours is typical, but this will depend on the user and the type of computer that is being used.)
Figure 1a. Modeling Session Flow-chart
Generally speaking, the computer hardware in the ChemGate Laboratory is intended to support a wide range of student and faculty experimentation. Its primary purpose, however, is to support instructional activities, and this activity takes precedence over all other uses. You can expect other classes to use the laboratory throughout the year, and these other users may occasionally reserve one or more workstations for a short period of time. Please respect and cooperate with these other users.
Finally, it is possible that this class (and others) could be disrupted by computer "downtime". Of course, not all equipment failures can be prevented, but experience shows that the main identifiable causes of equipment failure are (in no particular order): 1) failure to follow instructions for proper use of workstations and software, 2) dirt and dust, and 3) physical "abuse" of the hardware by users. Please follow all instructions for logging in and out of the computer. Do not bring food, drinks, or pets into the ChemGate Laboratory. Smoking is prohibited in the laboratory and throughout the Chemistry building. Under no conditions should you ever touch the computer screen with a pen, pencil, or other pointer type object (We strongly prefer that you do not place your hands on the screens too). Under no conditions should you move or reposition the workstations (or the monitors), or use them as a foot rest, book prop, etc.. Most important, under no conditions should you turn on or off any of the computer hardware, disconnect or reconnect hardware, or attempt to reconfigure the hardware in any way - all of these activities are performed exclusively by the computer support staff. In short, treat the computers as the expensive, highly sensitive research instrumentation that they are. With your cooperation and assistance, the ChemGate Laboratory will continue to be a useful teaching and research facility for years to come.
Each of you will have your own individual user account for use on the Indigo workstations (The same account can be used on all of the workstations). Do not share your password with anyone else since this will compromise the security of your user account. The procedures for logging in and out of any Indigo, and a description of the Indigo "desktop" follow.
As a rule, the workstation and monitor will always be turned on, but the monitor screen may be dark. If the screen is dark, move the mouse or press a key on the keyboard. If the screen does not light up, notify your instructor, and try using another workstation in the meantime. Under no circumstances should you power on/off, or reset, or physically move a workstation yourself.
Indigo Mouse Operation
The Indigo mouse has three buttons, and each performs a different function. Most "clicking" or "selecting" is done with the LEFT mouse button (Fig. 1b). The right and center buttons are used primarily inside the Spartan program. Unless specified otherwise, all mouse operations are assumed to involve the left button.
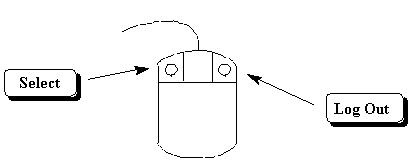
Figure 1b. Indigo Mouse Operations
Logging In
About the Desktop, Icons, and Windows
A typical Indigo desktop can contain several objects, including a "Toolchest", and various windows and icons (Fig. 1c). The "Toolchest" is located in the upper left-hand corner of the screen, and is used to initiate basic system activities, such as the creation of a "shell window" (ignore this if you are unfamiliar with UNIX). It is also used to log out.
"Windows" and "icons" can be placed anywhere on the desktop. Icons serve various functions; they may represent data files, file folders, and applications. The only two icons that you are likely to use are the Spartan icon (double-clicking on this activates the Spartan program) and the "dumpster" icon which is used to delete old files (file/folder icons must be dragged to the dumpster and then the dumpster must be "emptied"). It is only necessary to create an icon once; after that it will always appear each time you login.
The two most important gadgets in an Indigo window are the buttons in the upper right-hand corner. One zooms the window, and the other transforms the window into an icon (Fig. 1c), i.e., the window collapses into a small box at the top of the desktop. The "make icon" button is handy if too many windows have been opened at the same time (making a window into an icon does not stop or quit the program that launched the window). A window icon can be turned back into a normal window by clicking on the icon.
Indigo programs use "dialog" windows to communicate with workstation users. These windows always have a name in their title bar and will be identified in these tutorials as the "XXX" dialog window, i.e., the title bar will read "XXX".
Finally, two very important points that apply to all windows: 1) the cursor must lie inside a window for that window to be active, 2) clicking on a window's title bar causes that window to rise to the top of the window stack (a window does not need to be at the top of the stack to be active).
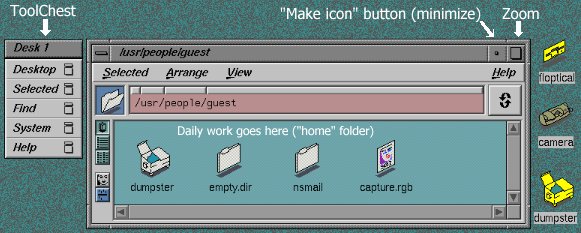
Figure 1c. Schematic Representation of a Typical Student Desktop
Opening an application (in this case Spartan)
On the Toolchest Icon select Apps, move the cursor to Spartan and click on the selection with the left mouse button. The Spartan window will then appear on the screen.
Another way to bring up the Spartan window is to select Desktop on the Toolchest Icon. Move the cursor to Unix shell and click on it with the left mouse button. A "Unix shell" will appear. This is really a window for typing commands. Move the cursor into the window and then type spartan. The Spartan window will then appear on the screen.
We assume that you are familiar with the use of your computer's keyboard and mouse. Spartan is a menu-driven program, and all menu items, buttons, and other objects, are selected or clicked by moving the cursor to the designated item and pressing the LEFT mouse button. Menu items are selected with two clicks: first you click on the menu title, then you click on the menu item. Menu items can also be selected by click-dragging, i.e., first click on the menu title, then, while continuing to press down on the mouse button, drag the cursor to the menu item and release the button. Textual input in Spartan is always placed in designated "text boxes." This is accomplished by clicking on the appropriate box (this is unnecessary if a cursor is already flashing inside the text box), followed by typing on the keyboard (The cursor must lie somewhere inside the window containing the text box while you type).
You can "zoom" the Spartan window so it fills the entire screen, or you can make the Spartan window into an icon by clicking on the appropriate window button. Zoom the window now.
Each Spartan menu refers to a group of related tasks. The File menu is used to create new models, open and close models, and save and delete models. The Model menu is used to change the appearance of a model on the screen, and the Geometry menu is used to obtain structural data about a model. The Build menu is used mainly to modify previously created models. The Setup menu is used to specify and initiate various calculations, and the Display menu is used to inspect the results of these calculations. On-line help can be accessed through the Help menu, and some additional program features can be accessed under the Wavefunction Logo in the upper left-hand corner.
The following instructions show several ways in which simple molecules can be built. The use of electrostatic potential maps to study the charge distribution in these molecules is also illustrated.
Octenol is an unsaturated (saturated would imply all single bonds) 8-carbon alcohol (Fig. 3). The techniques used to model this molecule can be applied to nearly any neutral, acyclic ("no rings") molecule. The following instructions show how to construct a model using one-atom fragments, how to manipulate the model on the screen, and how to calculate and display its charge distribution using an electrostatic potential ("elpot") map.
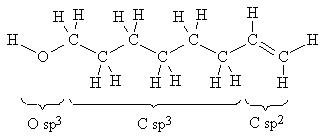
Figure 3. Atom Fragments Used to Build octenol
Note the bonds for the one "O sp3" oxygen (bent arrangement around oxygen), the six "C sp3" carbons (tetrahedral arrangement around carbon), and the two "C sp2" carbons (trigonal planar arrangement around carbon.)
To create a new model, select New from the File menu. This causes two new windows to appear: the Builder window and the Model Kit window (window titles appear in the title bar at the top of the window.)
 The Builder is where your model will appear as it is being built. It
also contains several important menus. The Model Kit holds the tool kit for
building models. There are five tool kits in Spartan: Entry,
Expert, Library, Peptide, and Nucleotide.
Click on the buttons, Expert, Library, Peptide,
and Nucleotide to see what these four different tool kits look like. All
five tool kits can be used to build a given model, but we shall normally work
with the Entry tool kit. Click on Entry now.
The Builder is where your model will appear as it is being built. It
also contains several important menus. The Model Kit holds the tool kit for
building models. There are five tool kits in Spartan: Entry,
Expert, Library, Peptide, and Nucleotide.
Click on the buttons, Expert, Library, Peptide,
and Nucleotide to see what these four different tool kits look like. All
five tool kits can be used to build a given model, but we shall normally work
with the Entry tool kit. Click on Entry now.
The Entry tool kit contains several different building blocks: a
library of one atom fragments, a library of functional group fragments
(Groups), and a library of ring fragments (Rings.) Each atom
fragment specifies a fixed and unique combination of elements, bonding
pattern, and geometry, and is represented by a button whose drawing conveys
this information (the five N buttons are shown in Fig. 4.)
| Button | |||||
| Hybridization | sp3 | sp2 | sp | sp2 (aromatic) | sp2 |
| Geometry (Bond Angle) | pyramidal (109.5°) | bent (120°) | terminal | bent (120°) | trigonal |
| Possible Neighbors | 3 | 2 | 1 | 2 | 3 |
| Possible Bonds (Unfilled Valences) | 3 single | 1 single 1 double | 1 triple | 2 aromatic | 3 single |
Before one can build a model, one must decide which atom fragments are
needed for the model's construction. This process is straightforward for most
molecules. For example, to build octenol one needs two different types of C
atoms (6 sp3 and 2
sp2) and one O atom
(sp3) (refer to Fig. 3). H atoms are
not needed since these are added automatically (see below.)
To begin, click on the sp3 C
 button, then click
anywhere on the bottom half inside the Builder window. A "wire" model of a
tetrahedral carbon atom appears in the Builder window
button, then click
anywhere on the bottom half inside the Builder window. A "wire" model of a
tetrahedral carbon atom appears in the Builder window
 (if you make a mistake,
select Undo, Add or Clear from the Edit
menu). The gray line segments intersect at the carbon nucleus. The yellow line
segments represent unfilled valences, where bonds will be later, and identify
places where new atom fragments can be attached to the carbon atom.
(Henceforth, these unfilled valences will be referred to as "bonds.")
Hydrogen atoms are automatically added at these locations when you save your
model, so it is unnecessary to add them to the molecule.
(if you make a mistake,
select Undo, Add or Clear from the Edit
menu). The gray line segments intersect at the carbon nucleus. The yellow line
segments represent unfilled valences, where bonds will be later, and identify
places where new atom fragments can be attached to the carbon atom.
(Henceforth, these unfilled valences will be referred to as "bonds.")
Hydrogen atoms are automatically added at these locations when you save your
model, so it is unnecessary to add them to the molecule.
Octenol contains a chain of 6 sp3 C atoms (Fig. 3). To add one C atom, click on the end of the "bond" that points "up". The "bond" is replaced by a second C atom. Continue adding C atoms at the "top" of the model until you have a chain of 6 C atoms.
Next, click on the sp3 O button
 , then click on the "top bond"
of the model. The O is colored red. At this point the model
has become very crowded with several overlapping unfilled valences. Before you
try to add the two sp2 C atoms, read the
following description of how you can move the model into other, more easily
studied, positions.
, then click on the "top bond"
of the model. The O is colored red. At this point the model
has become very crowded with several overlapping unfilled valences. Before you
try to add the two sp2 C atoms, read the
following description of how you can move the model into other, more easily
studied, positions.
Spartan uses the center and right mouse buttons to rotate and translate, respectively, models (Fig. 5.) These buttons have no other uses in Spartan. To rotate or translate a model, press the appropriate button and move the mouse as shown in Fig. 6 (you may also need to press the Shift and/or Ctrl key on the keyboard simultaneously.) Practice each movement with your unfinished octenol model. Does the model move the way you expect? Note that each operation continues (and the cursor changes shape) until you release the mouse button.
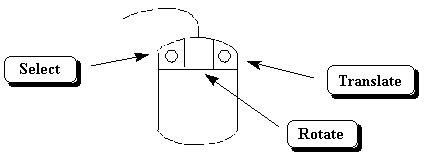
Figure 5. Spartan Mouse Operations
| Mouse Button | Mouse Movement | Model Movement |
|---|---|---|
| CENTER (Ctrl + CENTER rotates all models simultaneously) | 
| |
| CENTER (Ctrl + CENTER rotates all models simultaneously) | 
| |
| CENTER (press Shift Key too ® ) | 
| |
| RIGHT (Ctrl + CENTER translates all models simultaneously) | ||
| RIGHT (Ctrl + CENTER translates all models simultaneously) | ||
| RIGHT (press Shift Key too ® ) |
To finish building the model, click on the
sp2 C button  . Then click on the "bond" of the terminal C atom
(the C that does NOT carry O). Even though the
sp2 C atom can make both single and double
bonds, Spartan automatically makes a single bond between the
sp3 and sp2
C atoms because this is the only type of unfilled valence that both fragments
have in common.
. Then click on the "bond" of the terminal C atom
(the C that does NOT carry O). Even though the
sp2 C atom can make both single and double
bonds, Spartan automatically makes a single bond between the
sp3 and sp2
C atoms because this is the only type of unfilled valence that both fragments
have in common.
If necessary, rotate the model again so that you can see both of the "bonds" on the sp2 C. Click on the DOUBLE bond valence. Click on the sp2 C. Then Click on the DOUBLE bond valence again. Make sure that the two sp2 C atoms are connected by a double bond (rotate the model if necessary); otherwise select Undo Add from the Edit menu and try adding the second sp2 C atom again.
You have finished building a trial structure of your model, but you must save your model and return to the Spartan window before you can refine your model or calculate its properties. Both of these operations can be accomplished at the same time. Select Quit from the File menu (click on Yes, type "octenol" for your model name, and click on Save). Note: never use "special" characters to name your model: !@#$%^&*();" and so on. Stick to letters, numbers, "_" (space bar), and ".".
At this point the Builder and Fragment Panel windows will close and your model will appear in the Spartan window (you have also created a new set of files in your home folder.) Notice that the name of your model, "octenol" appears in the title bar of the Spartan window. You can still rotate and translate your model using the same mouse operations described above. You can also change the appearance of your model using the various menu items listed in the Model menu. Go ahead and try the different options in the Model menu. After you have finished, select Tube under Model. (This will make it easier to see the display of the "elpot" map for octenol.)
This section describes how to display the model's charge distribution. The charge distribution is calculated from an electronic "wavefunction" of the molecule. A "wavefunction" is a mathematical function derived from a molecular orbital (MO) configuration for a molecule which can be used to describe many of the corresponding properties such as the average of the nuclei as well as the energy of electrons in molecules. The "wavefunctions" of most molecules are real quantities which can be squared and converted into a three-dimensional grid of charge or "map" of the charge distribution for a molecule.
 Select Geometry Optimization as a Task. Click Save to
close the dialog box. Then from the Setup menu select
Submit. Wait until a prompt states the job is finished.
Select Geometry Optimization as a Task. Click Save to
close the dialog box. Then from the Setup menu select
Submit. Wait until a prompt states the job is finished.
 From the Setup menu select Surface. Then, select
Surface:density, Property: elpot, Resolution: low. Finally click
on Add to place your pending request in the scroll box,
click on Save to store your request and close the window. From
the Setup menu select Submit to initiate the calculation
(click on OK in each of the dialog windows.) If the calculation
fails at this point with the message "Job ... failed - Optimization ran out of
cycles" simply restart using Setup:Submit.
From the Setup menu select Surface. Then, select
Surface:density, Property: elpot, Resolution: low. Finally click
on Add to place your pending request in the scroll box,
click on Save to store your request and close the window. From
the Setup menu select Submit to initiate the calculation
(click on OK in each of the dialog windows.) If the calculation
fails at this point with the message "Job ... failed - Optimization ran out of
cycles" simply restart using Setup:Submit.
Each electrostatic map or surface is constructed by the Spartan program as the result of three general parameters. Surface identifies which variable will be used to create a three-dimensional "isovalue" surface, e.g., Surface: density indicates that the graph location will correspond to a surface of constant electron density (default value = 0.002 electron/Bohr3.) Property identifies which variable will be mapped or plotted on the isovalue surface, e.g., Property: elpot indicates the "electrostatic potential", i.e., the potential energy a positive unit point charge would feel. Since the electrons and nuclei in the molecule attract and repel a positive point charge respectively, elpot equals zero at any point where these forces are in balance. If the local region is unusually electron-rich, then the attractive force of these electrons will dominate and the elpot will be negative. The same reasoning indicates that electron-poor regions will have positive (repulsive) elpot values. Resolution indicates how smoothly (and accurately) the Surface and the Mapped Property will be drawn. Low resolution maps are less accurate and do not look as nice, but they can be created more quickly and require less storage space in the computer.
Click on OK to close the window, then look at the map. The map colors identify the value of the elpot according to the following color code: red (most negative) < orange < yellow < green < blue (most positive). In this case the property range was very asymmetric (red corresponds to a very negative elpot, while blue corresponds to a less positive elpot), so green regions are actually slightly electron-rich (this will be demonstrated below).
Rotate the molecule and its surface. Note the most electron-rich (red) and electron-poor (blue) regions, and try to determine which two atoms these regions correspond to. If you are having trouble identifying the atoms, select Display: Surfaces, select the surface in the scroll box, and select a different Style (even if you have identified the atoms, go ahead and experiment with different Styles now). Since the molecule is neutral overall, we say that these electron-rich and electron-poor atoms carry partial charges.
The polar -OH group dominates the chemistry of this molecule, and most other alcohols. The nonpolar -CH2- groups do not produce much interesting chemistry. Close inspection of the -CH=CH2 group shows that it has an unsymmetric charge distribution. The group is relatively electron-rich on its two faces, but relatively electron-poor in the atomic plane containing the atoms.
When you are finished experimenting with the different options in the Display: Surfaces window, select Close from the File menu.
Glycine is an amino acid and one of the building blocks that proteins are made from. Glycine prefers the "neutral" form in the gas phase and the doubly-charged "zwitterion" form in water, the solvent found in biological systems (Fig. 7).
Figure 7. Alternative Forms of Glycine
The zwitterion illustrates a general rule in organic chemistry, namely, that most organic ions can be derived from a neutral molecule by either adding or removing a proton (H+). Comparing the neutral and zwitterion forms shows that both rules come into play: the positive N has an extra proton and the negative O is missing a proton. This "form an ion by adding/removing a proton" rule is a useful guide to much organic chemistry and also to the techniques used to build models of organic ions.
Select File: New, i.e., select New from the File menu. Then click on the sp3 C button and click in the Builder window. This C will become the -CH2- group. The next step is to add the charged NH3 group. Note, however, that none of the N atom fragments in the Entry Fragment Panel have four bonds. The only way to add this fragment (or any other "protonated" atom) to a model is to use the Expert tool kit. Click on Expert, and the complete Periodic Table will appear.
 The atom fragments
in the Expert tool kit differ from the Entry fragments in that
they 1) must be "assembled" (you choose the element and the geometry
separately,) 2) there are more element/geometry combinations to choose from,
3) bond types are handled more loosely, e.g., it is possible
to bond a single bond to a double bond, and it is possible for an atom to
have "too many" bonds. In this case we need a N with four valences arranged
in a tetrahedral geometry. Click on N in the Periodic Table;
click on the tetrahedral X fragment
The atom fragments
in the Expert tool kit differ from the Entry fragments in that
they 1) must be "assembled" (you choose the element and the geometry
separately,) 2) there are more element/geometry combinations to choose from,
3) bond types are handled more loosely, e.g., it is possible
to bond a single bond to a double bond, and it is possible for an atom to
have "too many" bonds. In this case we need a N with four valences arranged
in a tetrahedral geometry. Click on N in the Periodic Table;
click on the tetrahedral X fragment  in the Fragment Panel; then
click on one of the unfilled valences of the C in the Builder window (if
you make a mistake, select Edit: Undo Add). The element and
geometry buttons are automatically combined when you click on the model.
in the Fragment Panel; then
click on one of the unfilled valences of the C in the Builder window (if
you make a mistake, select Edit: Undo Add). The element and
geometry buttons are automatically combined when you click on the model.
The "deprotonated" CO2 group can be built from the normal atom fragments in the Entry tool kit. However, we will illustrate instead a shortcut based on Spartan's library of functional group fragments. If necessary, click on the diamond to the left of Groups to select it. If necessary, click on Amide, then select Ester from the menu underneath the group fragment button (it does not matter whether you are using the Entry or Expert tool kit at this point). A drawing of the -CO2- fragment should appear on the pushbutton. Note that this fragment has two "bonds", one on C and one on O, and that one valence is marked by a small circle "o". The "o" indicates which bond will be used to connect the group to the model. Click on the pushbutton several times and watch the "o" alternate between the C and O. Stop when the "o" is on C. Then click on the appropriate "bond" of the C atom in the model. (refer to Fig. 7)


 At this point, one O needs to be "deprotonated", i.e., the "bond" must be
deleted. Click on Delete then
click on the yellow tip of the "bond" for the O atom. The
model should now look like the glycine zwitterion (see right.) Rotate and
examine your model carefully. If it has been built correctly, save the model
by selecting File: Quit (Click on yes.) Name the model:
"glycine".
At this point, one O needs to be "deprotonated", i.e., the "bond" must be
deleted. Click on Delete then
click on the yellow tip of the "bond" for the O atom. The
model should now look like the glycine zwitterion (see right.) Rotate and
examine your model carefully. If it has been built correctly, save the model
by selecting File: Quit (Click on yes.) Name the model:
"glycine".
Select Close from the File menu so the the current molecule will be erased from the screen .

At this point, close Spartan by clicking in the upper
left-hand corner and choosing Close. When the Unix shell appears, type:
cd /usr/local/chemistry/spartan (there is a space after "cd".)
When the Spartan menu appears, select Open from the
File menu. Double click on the glycine entry and choose
OK, which displays a glycine molecule in the zwitterionic form. The
elpot map has already been constructed. Display the electron density
map following the directions given previously for
octenol (p. 9 .) Note the zwitterion's polar character and the
regions of the molecule which are electron-poor and electron-rich. Note the
differences in the charge of both oxygen atoms.
Turn off the elpot map by selecting in order Display:
Surfaces, the surface in the scroll box, then click on the
Display Surface pushbutton and OK. The two O atoms occupy
different chemical environments. and this can be seen by comparing the CO bond
distances. From the Geometry menu select Distance, follow
the instructions in the title bar to measure the two CO bond distances (record
the distances,) then click on Done. The longer distance should
correspond to the single bond (you can see which CO bond was built as a single
bond and which was built as a double bond by selecting Wire from
the Model menu.) Double: _________;
Single: _________.
Note that the two bond lengths are almost identical. This is because there is
neither a "true" double bond nor a "true" single bond. The bond length is
intermediate between a double and single bond. The structure is said to
exhibit resonance.
Also measure the O- to N+ distance. Any distance less than 2.0 Å is considered very short and suggests a special attraction between these atoms. In this case, the attraction is electrostatic; the atoms have opposite partial charges and this produces a real attraction known as a "hydrogen bond." Since this attraction is within the molecule it is known as intramolecular hydrogen bonding. Another way to detect a close approach between nonbonded atoms is to display a model as a space-filling model. Select Model: Space Filling. Each atom is represented by a sphere, and the spheres of nonbonded atoms do not overlap much unless they are forced together.
Since the two CO bond distances were nearly identical then there should also be a relationship between a molecule's charge distribution and its geometry. The closeness in the two bond distances will result in a more symmetric charge distribution. This can be verified by again displaying the elpot map. From the elpot map, it should appear that the charge is symmetrically distributed. Again this is explained by the resonance of the structure.
