ENGINEERING 182�� BASIC ELECTRONIC CIRCUITS LAB 4
�� THE FOLLOWING
INSTRUCTIONS, DIAGRAMS, AND QUESTIONS ARE MEANT TO HELP YOU UNDERSTAND ABOUT
BASIC ELECTRONIC CIRCUITRY.� YOU MAY
CONSTRUCT THE CIRCUITS BY REFERRING TO ANY WRITTEN PROCEDURES, OR TO SCHEMATIC
DIAGRAMS, OR TO BOTH DEPENDING ON YOUR PREFERENCES.� IT IS RECOMMENDED THAT YOU USE WRITTEN
PROCEDURES FOR THE DEBOUNCE CIRCUIT (THE FIRST CIRCUIT OF THIS LAB), HOWEVER,
YOU ARE EXPECTED TO CONSTRUCT THE PHOTOCELL CIRCUIT (THE SECOND CIRCUIT OF THIS
LAB) BY REFERRING ONLY TO THE SCHEMATIC DIAGRAM.� ALSO, IF ANY CIRCUIT DOES NOT WORK AS
EXPECTED, OR ANY COMPONENT GETS HOT TO THE TOUCH, UNPLUG THE POWER SUPPLY
AND RE-CHECK YOUR WIRING !�
ASK FOR HELP BEFORE SPENDING TOO MUCH TIME DEBUGGING ON YOUR OWN.
1.
LOCATE the following PIECES and PARTS in your
ELECTRONIC PARTS KITS or on the TABLE:
A power supply with wire leads, a Digital Multi-Meter (DMM), a switch, an LED, three 100 Kohm resistors (brown/black/yellow), a 330 ohm resistor (orange/orange/brown), three 1 Kohm resistors (brown/black/red), a blue trim potentiometer, a 0.01 mF capacitor, a 1 mF capacitor, a 10 mF capacitor, a 2N2222 transistor, a digital counter display, a NE555 Timer (8 pin IC), an LM324 Quad Comparator (14 Pin IC), a photocell, a wire jumpers kit, and a prototyping board.
2.
UNPLUG the power supply from the electrical outlet.
3.
Choose a convenient location for the NE555 TIMER (8
Pin IC) and carefully press the pins of that IC into the prototyping
board.� The IC should STRADDLE ONE OF THE
GAPS in the prototyping board.� Insure
you can IDENTIFY THE LOCATION OF PIN 1 on the IC.
4.
On the prototyping board, CONNECT one LEAD of the
SWITCH to a GROUND hole (blue line).�
CONNECT the other LEAD to an available hole in the 5-hole terminal set
that has IC PIN 2 as part of the set.
5.
CONNECT a 100 Kohm
RESISTOR from that same set to +5 VOLT POWER bus (red line).
6.
CONNECT a 0.01 mF
CAPACITOR from the hole set of IC PIN 5 to GROUND (blue line).
7.
CONNECT a JUMPER WIRE from the hole
set of IC PIN 1 to GROUND (blue line).
8.
CONNECT a JUMPER WIRE from the hole
set of IC PIN 4 to +5 VOLTS (red line).
9.
CONNECT a JUMPER WIRE from the hole
set of IC PIN 8 to +5 VOLTS (red line).
10. CONNECT
a VERY SHORT JUMPER WIRE from the hole set of IC PIN 6
to the hole set of IC PIN 7.
11. CONNECT
a 100 Kohm RESISTOR (brown/black/yellow) from the hole set of IC PIN 6 to the POWER bus (red line).
12. CONNECT
a 10 mF CAPACITOR from the hole set of IC PIN 7 to GROUND (blue line).� Insure the LEAD MARKED WITH A NEGATIVE SIGN
is CONNECTED to GROUND (blue line).
13. INSERT
the 2N2222 TRANSISTOR in a convenient board location ACROSS THREE UNUSED HOLE
SETS.
�
14. CONNECT
a 1 Kohm RESISTOR (brown/black/red) from the hole set
of IC PIN 3 to the hole set of the MIDDLE LEAD (�B�) OF THE TRANSISTOR.
15. CONNECT
a 100 Kohm RESISTOR (brown/black/yellow) from the
hole set of TRANSISTOR LEAD �E� to GROUND (blue line).
16. INSERT
the CONNECTOR FROM THE DIGITAL COUNTER DISPLAY across FOUR UNUSED HOLE SETS
NEAR THE TRANSISTOR.
17. CONNECT
a JUMPER WIRE from the hole set of TRANSISTOR LEAD �E� to the hole set of the
DIGITAL COUNTER DISPLAY CONNECTOR PIN 1 (SILVER MARK).
18. CONNECT
a JUMPER WIRE from the hole set of TRANSISTOR LEAD �C� to the hole set of the
DIGITAL COUNTER CONNECTOR PIN 3.
19. CONNECT
LEADS from the POWER SUPPLY to the prototyping board.� INSURE that the POSITIVE LEAD goes to the
GREEN POST while the NEGATIVE LEAD (ground, GND, or COM) goes to the BLACK
POST.� At the same time, CONNECT JUMPER
WIRES from the POSTS to the POWER BUS sets.�
The +5 (GREEN POST) should wire to the RED STRIPED sets while the GROUND
(BLACK POST) should go to the BLUE STRIPED sets.
20. INSURE
THE RESPECTIVE POWER BUS SECTIONS (RED AND BLUE)� ARE PROPERLY JUMPERED TO PROVIDE POWER TO ALL
BUS SECTIONS OF THE PROTOTYPING BOARD.�
INSURE RED IS JUMPERED ONLY TO RED AND BLUE ONLY TO BLUE !!
21. PLUG IN
the POWER SUPPLY to the 120 Vac ELECTRICAL OUTLET.
22. SET the
DMM to a 20 Vdc range (three �clicks� counterclockwise
from OFF position).
23. CONNECT
(HOLD) the BLACK PROBE OF THE DMM to the BLACK POST ON THE POWER SUPPLY.� ALL READINGS WITH THE DMM SHOULD BE TAKEN
WITH ITS BLACK PROBE CONNECTED TO THE BLACK POST OF THE POWER SUPPLY !!!
24. TOUCH
the RED PROBE OF THE DMM to IC PIN 4.�
The DMM should READ ABOUT 5 VOLTS.�
TOUCH the RED PROBE OF THE DMM to IC PIN 8.� The DMM should READ ABOUT 5 VOLTS.� (Any time you do not get the stated readings,
unplug the power supply and recheck your wiring).
25. WHILE
VIEWING THE DIGITAL COUNTER DISPLAY, PRESS AND RELEASE the SWITCH LEVER.� The COUNTER DISPLAY READING should INCREMENT
BY ONE.� (IF THE READING DOES NOT
CHANGE, UNPLUG THE POWER SUPPLY AND RECHECK YOUR WIRING).� Also, the BUTTON ON THE FRONT OF THE DIGITAL
COUNTER DISPLAY is used to RESET the DISPLAY TO ZERO.��
26. MAKE the
following VOLTAGE MEASUREMENTS using the RED PROBE of the DMM:
a. IC PIN 2
with SWITCH RELEASED�
�������..._______________ Volts
b. IC PIN 2
with SWITCH LEVER PRESSED AND HELD _______________ Volts
c. IC PIN 3
with SWITCH RELEASED�
��������_______________ Volts
d. IC PIN 3
with SWITCH LEVER PRESSED AND HELD _______________ Volts
27. WHILE TOUCHING IC PIN 3 with the RED PROBE, PRESS AND IMMEDIATELY RELEASE THE SWITCH LEVER and TIME HOW LONG THE DMM READING STAYS CHANGED FROM ITS INITIAL VALUE.�� ___________________� seconds.
28. SET the DMM to OFF and UNPLUG THE POWER SUPPLY.
29. INCLUDE
THE ABOVE READINGS IN YOUR LAB REPORT !
30. UNPLUG
THE POWER SUPPLY.� CONSTRUCT
THE PHOTOCELL CIRCUIT SHOWN BELOW.� NOTE
this circuit uses the debounce circuit you just
completed except the switch input is replaced by additional
circuitry.� The circuit should give a
count pulse each time the light beam from the LED to the photocell is
interrupted.
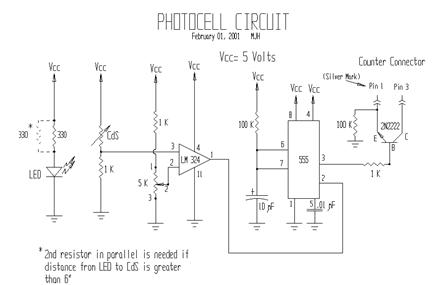
31. You are
expected to construct this final circuit by reference to the schematic diagram
above.� If help is needed, ask your TA or
Instructor.
32. IMPORTANT
NOTE:::� An adjustment must
be made to the reference voltage at IC LM324 PIN 2 for proper operation to
occur.� This adjustment is performed as
follows.� If ALL WIRING IS CHECKED,
PLUG IN THE POWER SUPPLY.� SET the
DMM to a 20 Vdc range (three �clicks� counterclockwise
from OFF position).
TOUCH THE RED PROBE to IC LM324
PIN 3 and NOTE THE VOLTAGE.�
___________volts.� Now, BLOCK THE
LIGHT BEAM and NOTE THE VOLTAGE at the SAME POINT _____________volts.� CALCULATE and NOTE the average value of the
two readings _____________� volts.� TOUCH the RED PROBE to IC LM324 PIN 2.� WATCH the READING at that point and ADJUST
the BLUE TRIM POTENTIOMETER until the voltage reading is NOMINALLY THE AVERAGE
VALUE you just calculated.� (What you
have done is set a reference voltage that is used by IC LM324 to compare an
input signal to.� The input signal is the
voltage variation due to light changes at the photocell.� The output signal of IC LM324 (PIN 1) will be
�low� (less than 0.5 volts) when the input signal is lower than the reference
voltage, and will be �high� (greater than 1.6 volts) when the input signal is
greater then the reference voltage).�
With the adjustment made, the circuit should now properly count each
time the light beam is interrupted.
33. VERIFY and NOTE the TIME DURATION OF THE OUTPUT PULSE at IC 555 PIN 3 as being about the same time as with the isolated debounce circuit.�������������������� �� _________ seconds.
34. As a FUN exercise, UNPLUG THE POWER SUPPLY and replace the 10 mF CAPACITOR with a 1 mF CAPACITOR from your kit.� Insure the polarity is observed.� PLUG IN THE POWER SUPPLY.� What difference do you see in the operation of the photocell circuit?_________________________________________
______________________________________________________________________________
______________________________________________________________________________
______________________________________________________________________________
35. UNPLUG THE POWER SUPPLY and TURN OFF THE DMM !!!
36. Have a member of your team DRAW the PHYSICAL LAYOUT of your CIRCUIT on the handout prototype board sheet provided.
37. INCLUDE THE ABOVE READINGS and SKETCH IN YOUR LAB REPORT !
38. You have COMPLETED the HANDS-ON PORTION of the LAB !!